E-commerce
Keep your catalog, orders and shared contacts together so your team and agents can help customers. Use Versafy without a store, or connect WooCommerce to import records and synchronize supported changes.
Connect WooCommerce
You need access to WooCommerce settings in WordPress and permission to manage integrations in Versafy. Use an HTTPS store URL. Each workspace supports one active e-commerce store connection alongside its Versafy records.
Store changes can trigger the store’s usual customer or order notifications. Check notification settings before using real customer details.
Create a key in WooCommerce
- In WordPress, open WooCommerce → Settings → Advanced → REST API.
- Choose Add key or Create an API key.
- Enter a description such as Versafy, select a user who can manage the store records, and set Permissions to Read/Write.
- Choose Generate API key. Keep the page open to copy the Consumer key and Consumer secret into Versafy. The secret is shown only once.
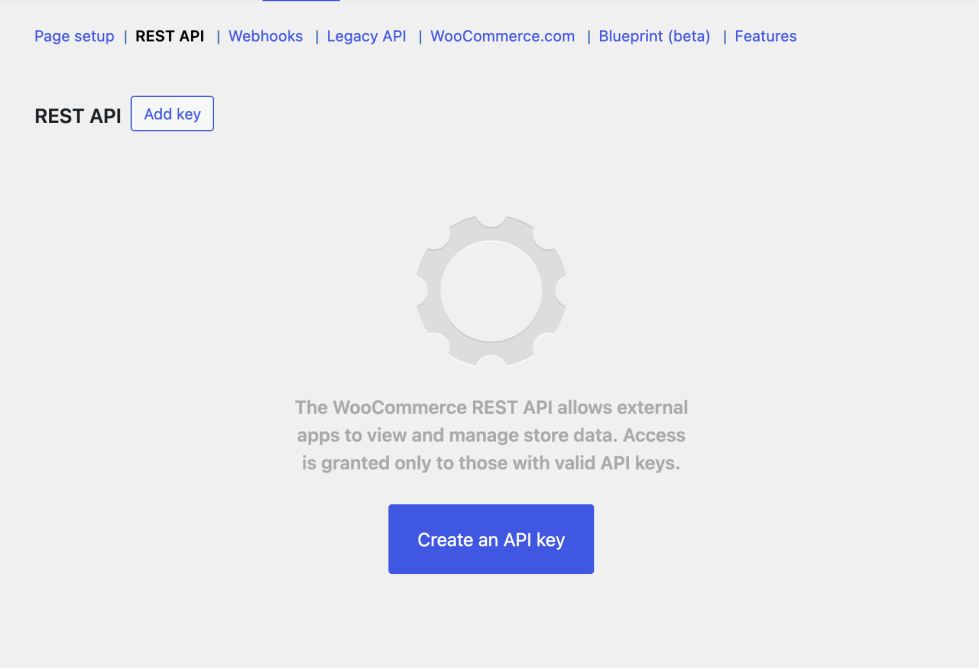
Screenshot and reference: WooCommerce’s official key-creation guide . Labels may vary with language or version. If verification fails, check WordPress Settings → Permalinks and use a readable format instead of Plain.
Connect the store in Versafy
- Open General → Integrations → E-commerce platforms → Connect E-commerce platform.
- Select WooCommerce. Enter a connection name, store URL, Consumer key and Consumer secret.
- Choose Verify access, review the permissions, then Connect store.
- Open Sync with WooCommerce to follow the initial import. E-commerce pages show the connected platform and last successful sync.
Read/Write enables automatic synchronization and supported store edits. A Read key allows imports only: use Sync with WooCommerce → Refresh after store changes. Integrations shows Read only. After changing the existing key’s permissions, choose Recheck access; reconnect if you generated replacement keys. With Read-only access, store product/order edits and agents’ Create orders tool are disabled. Contacts remain editable in Versafy and can update other connected systems.
Work with your records
Open E-commerce → Products or Orders, or General → Contacts. When Shopify is connected, the E-commerce section is hidden from the menu: your store’s products and orders are in the Shopify section, and Contacts stays under General. Use search and source filters, Create, and each row’s Actions menu. All sources creates products and orders in the connected store; select Versafy to create local records. Without a store, new records use Versafy. An unavailable or Read-only store does not silently fall back to local creation.
Products show their store Product ID, or their local ID. Product Sync status is read-only. Orders show Order date separately from Updated; Contacts show Created and Updated; select either column header to sort by it — newest first, then oldest first on the next click. Choose how many rows each page shows below the list. Contact Name follows First name and Last name when either is filled in. Leave both empty to edit an unsplit captured name. The question-mark hints explain this. Enter phone numbers with a country code, for example 15551234567 or +15551234567; a missing + is added and spaces, brackets and dashes are removed. Phone can be empty.
Contacts are shared across communication channels. The store filter selects linked contacts; No store link selects unlinked contacts. WooCommerce requires an email address to create a customer. A contact can have different synchronization outcomes for its store and CRM connections. Connections show each integration’s name and status; choose Show more to see more than two connections. To open a contact in your CRM, select Open in CRM next to that CRM in the Connections column; the contact’s record opens in a new tab. This works for Kommo and Planfix connections once the contact’s record exists in the CRM.
For orders, select a contact or leave the order as a guest, then add products and variations. Stores may calculate totals and apply their own stock and notification rules. Use Inventory on Versafy orders to reserve, release or consume stock. Stock corrections preserve existing reservations; consumption does not subtract held stock twice. Release reservations before deleting a product/order or disabling tracking. Changing order status does not automatically restore stock.
Contact sources
Use Source in Contacts to see where each contact originally came from, even after information is updated or synchronized elsewhere. Sources include Meta Ads, Webhook, Chat Agent, Email Agent, Voice Agent, CRM Import, Commerce Import and Manual. Older contacts show Unknown when their original source cannot be established.
Open a Source value to see recorded names and IDs. Agent names link to their pages when available to you. Related Meta Ads submissions include campaign and form details; View submission history opens the existing proof history. Related submissions do not change the original source.
To see how a contact’s details changed over time — for example, which conversation gave a customer’s new phone number — open its Source value and choose View change history. The history lists the latest 50 changes, newest first: details an agent saved from a conversation, email or call, edits by your team, Instant Form leads and imports. For changes by agents and your team it shows each field’s previous and new value; older changes are shown without values. When you clear a field, its earlier values are removed from the history and only the field name remains. Open conversation, Open email or Open call opens it in Chats when you have access to it there.
When creating a contact, Source defaults to Manual. You can select another type and optionally choose an Agent or connection. The original source cannot be edited afterward. Use the source filter together with Store connection to narrow the list; synchronization destinations remain in Connections.
For Meta Ads submissions, the source popup also shows Submitted, Discovered and every saved Instant Form answer. View submission history shows these details for each submission. Supported CRM contacts receive a note containing the source, campaign and form, submission and discovery times, and answers. To add missing notes to existing contacts, choose Sync saved details to CRMs. This requires permission to manage Contacts and uses active linked CRM contacts whose connection status is Synced; it does not create new CRM contacts or reset failed connections. Check Connections for the result and review failed connections separately.
Open a contact’s conversations
To review a customer’s history across agents, open General → Contacts, then choose Actions → View chats on that contact. Chats opens with a removable Contact filter and shows the messages, email threads and calls you have permission to read. You need permission to view Contacts and at least one conversation source; editing permission is not required. See Chats for matching rules and filters.
To see where a customer writes to you, look under their name in General → Contacts. Each Telegram, Instagram, Facebook, TikTok or WhatsApp chat linked to the contact shows the customer’s @username there, or their profile name when there is no username — for example, @anna_shop under Anna. Select it to open that chat in Chats, listed with the contact’s other conversations — for example, chats with two of your agents on the same platform; without permission to read chat conversations, it is shown as text only. A WhatsApp chat with the contact’s number is listed once the customer writes or an agent task messages them; other chats once an agent has saved the customer’s details from them. Search in Contacts also finds a contact by @username or profile name.
How agents use contacts
Contacts are your agents’ memory of a customer. Chat, email and voice agents read a customer’s contact before they answer — name, email, phone, shipping address and the latest Instant Form answers — so the customer does not have to repeat themselves, and they save the details they capture to the same contact.
A conversation, email or call is linked to the contact the agent saves details to; a WhatsApp conversation is linked to the one contact with the customer’s number when the customer writes or an agent task messages them, and a call as soon as it ends. Until a link exists, the agent looks for the one contact with the customer’s WhatsApp number, email address or caller number. If there is none, it matches the email address and phone number the customer gives when it saves details, so a customer who writes on Instagram and later on Telegram keeps one contact. When the details point to several contacts, the customer is treated as new and a new contact is created. Typed details are not verified: a customer who gives another person’s email address is matched to that person’s contact. Keep one contact per customer to get the best results. Notes are for your team only and are not shared with agents. See Chat Agents, Email Agents and Voice Agents.
Find duplicate contacts
One customer can end up with two contacts — for example, when a teammate adds a contact by hand for a customer an agent already saved, or when your CRM has two records of the same person. Agents then cannot tell which contact belongs to the customer and may create yet another one. Finding these pairs helps you keep one contact per customer.
In General → Contacts, choose Duplicates: possible in the filters. The list shows contacts whose email address or phone number matches another contact’s, with the records of one person next to each other. Email addresses match regardless of capital letters, and phone numbers regardless of spaces, brackets, a leading + or 00; names alone never make a match. Sorting by Created or Updated still works: records of one person stay together, the groups are ordered by their newest date (their oldest when sorting oldest first), and the records in each group follow the same order.
In every view, a contact with matches shows a badge such as 1 duplicate under its name; the number counts the other contacts with the same email address or phone number. A shared mailbox, such as a shop’s info address, or a family phone shows up too, so check the details before you treat two contacts as one person.
Merge duplicate contacts
Merge two contacts of one person so your team and agents see a single customer again: chats, emails, calls, orders, history and follow-ups end up in one place, and the customer’s next message finds the right contact. For example, merge the Chat Agent contact and the CRM Import contact of the same customer.
You need permission to manage Contacts. Merging can’t be undone: the other contact disappears from the list.
- In General → Contacts, choose Actions → Merge with… on one of the contacts, or select its badge with the number of duplicates, such as 1 duplicate.
- Choose the other contact. Contacts with the same email address or phone number are listed first; search to find any other contact by name, email or phone.
- Under Choose what to keep, select the contact to keep. The older contact is selected first. Its details stay, and empty details are filled from the other contact. Where both contacts have different values, choose the one to keep. When both contacts have notes, Notes shows them joined; edit the text if needed, up to 10,000 characters. Once you change something, a click outside the window no longer closes it; choose Cancel to leave without merging.
- Check Moves to the kept contact and CRM and stores, then choose Merge contacts and confirm the merge: it can’t be undone.
After the merge:
- The other contact’s chats, emails, calls, orders, Instant Form leads, follow-ups and change history belong to the kept contact. Its history shows Merged with … and the email address or phone number that was not kept.
- If either contact unsubscribed from automatic emails, the kept contact stays unsubscribed.
- If both contacts had a follow-up running in the same channel, the other contact’s follow-up stops.
- A CRM or store record linked only to the other contact is linked to the kept contact and receives its details.
- A saved View chats link of the other contact opens the kept contact, and new store orders of the other contact’s customer are added to the kept contact.
Merging is not available while a sync of either contact is running; try again in a minute. When both contacts have their own record in the same CRM or store, the kept contact stays linked to its record, and the CRM and stores section shows both record numbers. The other record stays in that CRM or store and isn’t imported again: merge it there into the kept contact’s record, or delete it. Keep the kept contact’s record, otherwise its sync with that CRM or store stops. An email address or phone number that was not kept is no longer used to recognize the customer.
Follow-ups and unsubscribes
See which customers your agents are following up and who asked not to receive automatic emails. For example, before you call a lead, open their details to check whether a reminder is about to go out so they do not get both.
- In a contact’s details, the follow-up panel offers Pause, Resume, Cancel chain and Open in Agent Tasks. See Follow-up chains.
- A contact who unsubscribed shows an Unsubscribed badge, and the Automatic emails filter lists them. No agent sends them follow-ups or the first email of an automation; replies to emails they write are still allowed.
- If someone asks you by phone or in a chat to stop these emails, open their details and choose Unsubscribe from automatic emails. Every contact with that address is unsubscribed, and the change is recorded in the history.
- If the person asks to receive these emails again, open their details and choose Allow automatic emails again. The change is recorded in the contact’s history.
Review Analytics
Open E-commerce → Analytics to compare daily orders, order value, refunds and statuses. Source and period filters apply immediately; the calendar supports custom ranges of one to 366 days. Currencies stay separate. Dates use UTC order-placement dates, not the last sync date.
All statuses are included. Recorded order value includes tax and shipping; refunds are separate and not subtracted. It is not collected revenue. Orders awaiting store confirmation are excluded. Check the last sync and incomplete-history notices before relying on totals.
Assistant activity counts conversations with recorded product/order assistance. Each conversation is counted once per day and once per selected period, so daily counts may exceed the period total. Open conversations for available links. Incomplete activity is not a complete sales-attribution report.
Monitor synchronization
Changes normally sync when saved; WooCommerce sends subsequent store changes automatically with Read/Write access. Open Sync with WooCommerce for import progress, webhook health and Store edits. Refresh imports changes manually. Repair webhooks repairs automatic notifications but preserves subscriptions paused in WooCommerce; resume those in the store.
Select Needs review on a record to open its Sync dialog. Unresolved changes appear first; completed or discarded changes move to Recent history. Review edit compares current and requested values before Retry edit. If retry fails, the explanation remains visible; choose Check latest values before retrying again. Check store status checks an uncertain creation without blindly creating a duplicate.
Correct and retry opens a rejected edit for correction and reuses the same change. If the store requires another currency, enter the intended prices yourself; currency is not converted automatically. A successful save in Versafy can still need synchronization attention.
Discard edit asks for confirmation and does not undo changes already saved in the store. It removes an unuploaded product/order draft; contacts remain in Versafy with the destination unsynced. A store-deleted record cannot be retried. No outstanding store changes does not mean local-only records were uploaded.
Disconnect stops synchronization after confirmation but retains imported records. Use Connect store on the disconnected connection to reconnect. A loading failure shows Retry; an empty table means no records match the current filters.
Let agents help customers
Customers can share a product link to help the agent find the exact item. Prices and availability are checked with the store before an order is quoted and submitted; a price supplied by the customer cannot replace that check.
Enable E-Commerce Tools in chat, email or voice agent settings to search products, look up orders and create unpaid orders. Expand a tool to customize its instructions. The category shows the connected platform and offers the connection form when none is connected and you have permission. When Shopify is connected, these tools are not offered: agents use the Shopify tools instead.
Before ordering, agents collect missing customer and delivery details, present the exact items and price, then wait for explicit customer confirmation in a later message. Digital items need no delivery address. Changed prices or availability require another review. Agents do not collect payment and include the order number after successful creation.
An exact order number can be used to check status. More details require a billing email/phone matching the verified conversation channel, or a supported store order key. Merely typing contact details into a conversation does not verify ownership. If several orders match, the agent asks the customer to choose.